10 Effective Tips To Deal With Makeup Problem In Summer

Effective Tips To Deal With Makeup Problem In Summer

Summer isn’t the right time to wear makeup or it would be more appropriate to say that you need to change the way you wear makeup keeping the summer heat in mind.

As soon as you step outside, the hot sun will start baking your makeup. Skin produces excess sweat to cool off but the excess moisture could drain the layers of your makeup. Also, the melted makeup can enter your skin pores and create more problems.

Here’re 10 reliable ways of doing makeup in the summer time

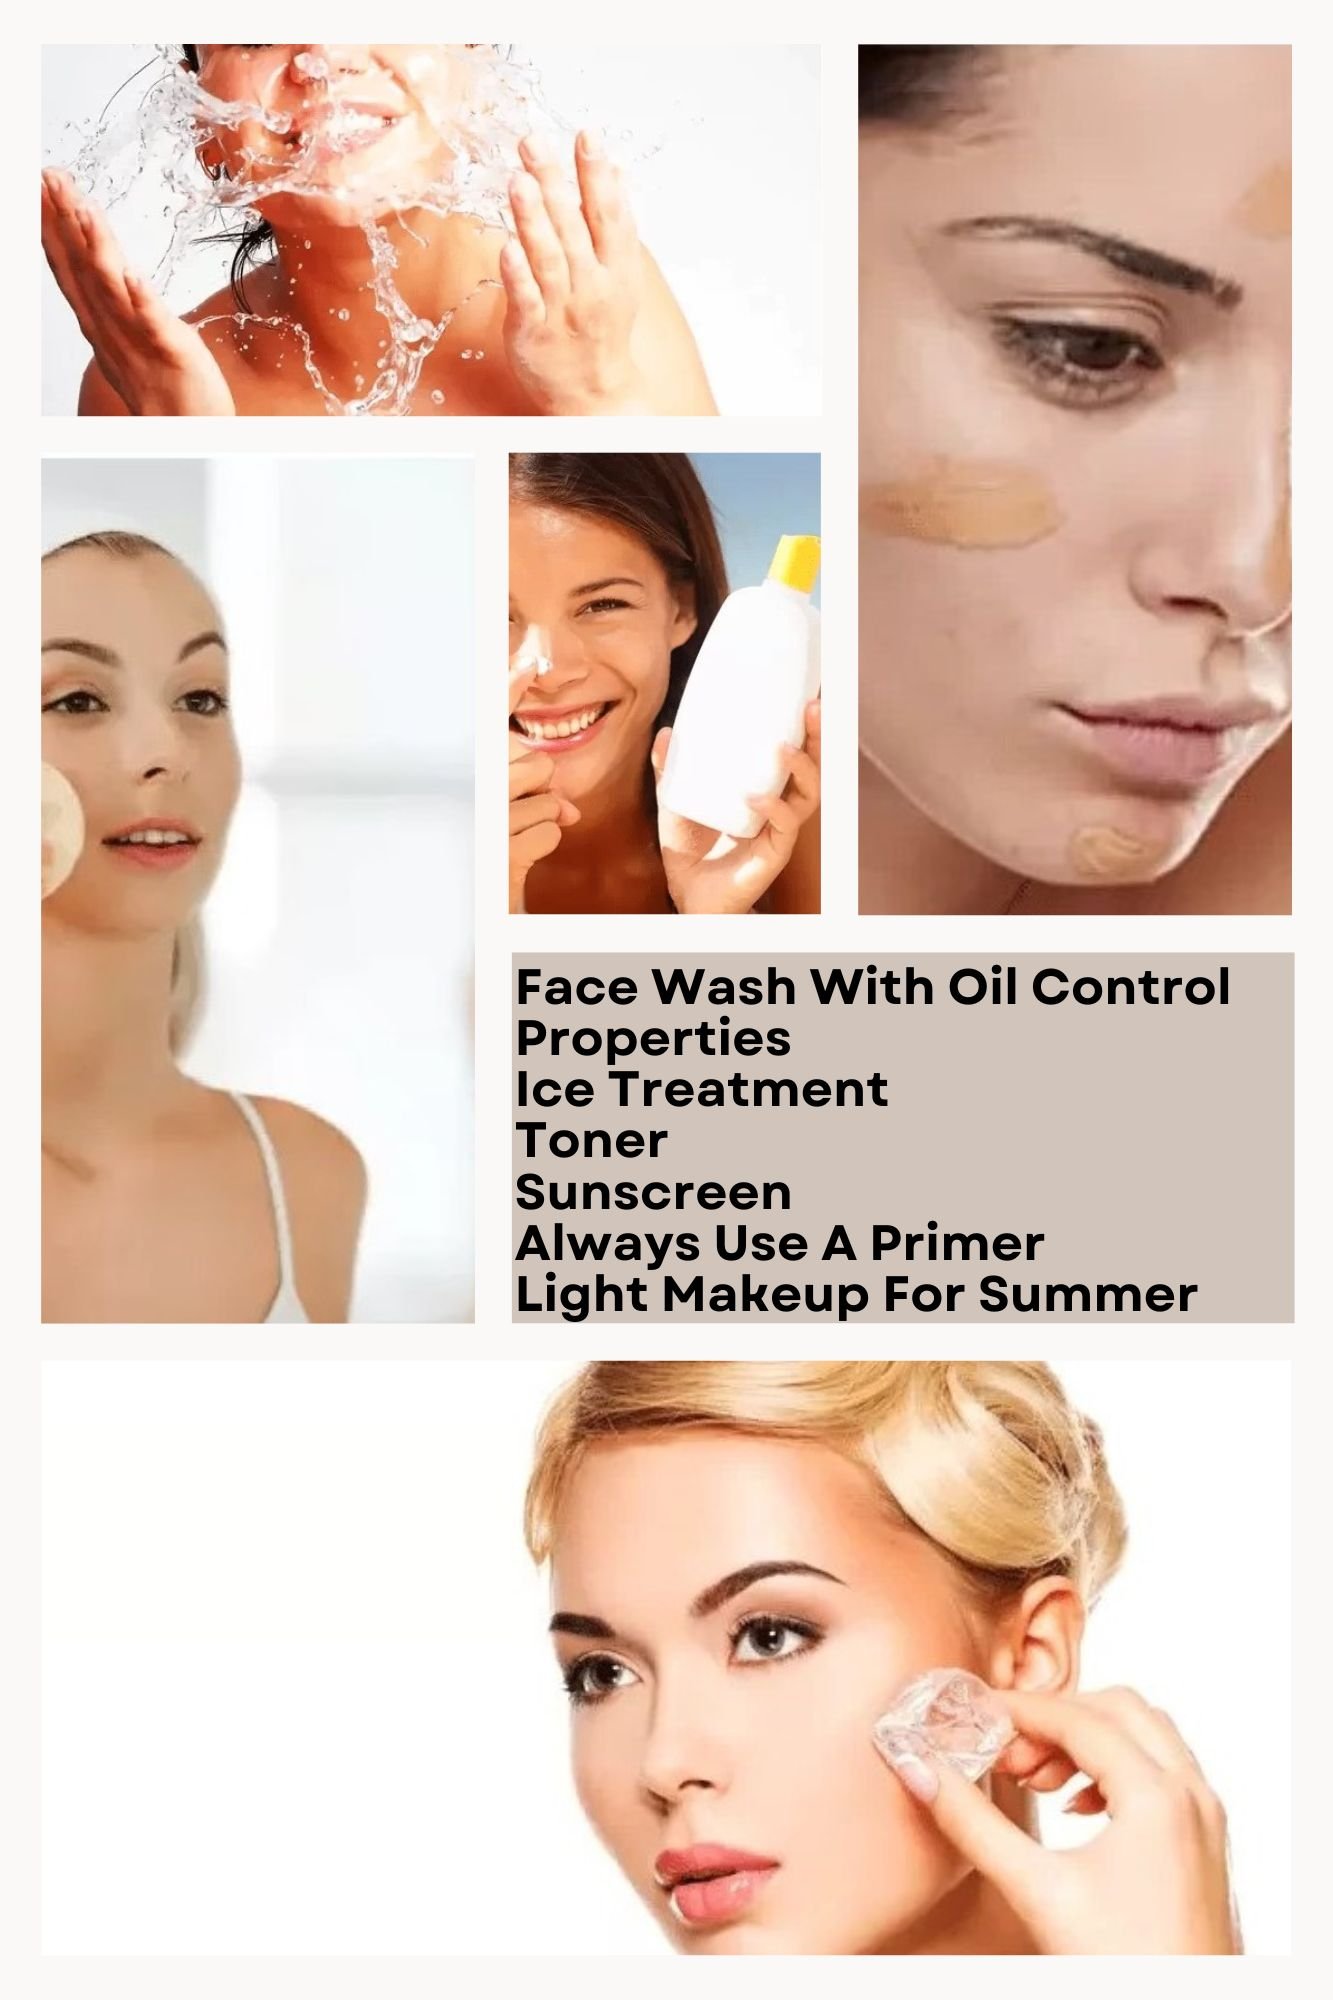
Face Wash With Oil Control Properties

Buy a face wash that can soak the excess oil with impurities and give your face a fresh look and feel. Also, it will tone up the skin cells. A cool sprinkle of a quality face wash followed by a pat dry session with a towel or tissue is sufficient to recharge your cells. Summer heat could be harsh on your face, but this simple formula can keep you fresh all day. Just a splash of a refreshing face wash is enough to rejuvenate your skin.

Ice Treatment

Grab an ice cube and start pampering your skin soft and tender facial skin with the cool stuff. You can use it directly but be careful so as not to irritate the capillaries in the skin. A cold touch isn’t good for delicate skin, but there is little harm in pampering your skin with an ice cube to prevent the meltdown of the makeup. A gentle massage for a couple of seconds is sufficient to close the large pores and prevent the makeup from melting. Pat-dry your skin after the treatment.

Effective Tips To Deal With Makeup Problem In Summer

Effective Tips To Deal With Makeup Problem In Summer

Toner

Applying a quality toner to your facial skin up to the neck area is sufficient to rejuvenate your tired skin. And you can use a toner with a cotton ball. Simply take a toner cream on a cotton Read More

Hide Your Pimples Behind Makeup Or Distract Breakouts With Makeup

Hide Your Pimples Behind Makeup

Acne or breakout is common but it is unwelcome. A breakout, however small it is, could spoil your look. While there are treatment options available to treat acne, but the treatment takes time in giving results, so cover your acne with makeup.

The biggest problem with acne or breakout is that they can form anytime and without prior warning. So, if you aren’t ready to hide a red spot on your face, you will certainly miss big events.

Learn to cover acne with makeup

Cosmetics needed to cover acne and breakouts with makeup

  1. Primer

A lightweight and oil-free primer would work well as it can hold the makeup at the inflamed spot for a long time. If you fear hyperpigmentation or scarring, then you should buy a primer with SPF. It is necessary to use an SPF cream as exposure to the sun could slow down the healing process and lengthen the suffering.

  1. Concealer

Find a matching concealer for your skin tone as color correcting can provide real help in hiding inflammation and scarring. Put more focus on finding the best match to get better results. It is only a matching concealer that can match the redness of the breakouts with your skin tone.

  1. Concealer Brush

A concealer can help hide your breakouts only when it is applied correctly. And for correct application, you need a spot concealer brush. Choose one that you are comfortable with so you get a perfect blending of the formula and precise application of the cosmetic. Quality of results achieved largely depends on the functionality of the brush.

  1. Foundation

Foundation forms a strong base of makeup and when you are wearing makeup to hide acne, you should use a non-comedogenic foundation that works well for acne-prone skin. Its advantage is that it contains lesser chemicals that will keep your skin safe and won’t interfere with your … Read More

Tips For Safer Sensitive Eye Makeup

Tips For Safer Sensitive Eye Makeup

Eye sensitivity is a common problem but there is little need to worry about it as you can still do safe sensitive makeup without facing an allergic situation like irritation and watery eyes. First thing is to know what causes allergies to your eyes and second thing is to buy cosmetics that are safe for your eyes.

Also, you need to keep some tips and tricks in mind that can help wear eye makeup without any allergic reaction. But before you proceed, you should get an education on eye sensitivity.

What Is Eye Sensitivity?

Eye sensitivity is an allergy to foreign products including makeup products. Whenever you touch the areas around your eyes with cosmetics, you feel irritation in the eyes. It is called contact dermatitis. It could be due to an underlying skin condition or you could develop sensitivity to cosmetics over time.

Types of contact dermatitis

Eye sensitivity or contact dermatitis can be classified into allergic and irritant categories depending upon their causes. The classification helps in understanding eye sensitivity.

Allergic Contact Dermatitis: If you are allergic to certain products and those products are included in your cosmetics, you will develop allergic contact dermatitis. As a result, your eyes will become red and itchy. In severe cases, your eyes could swell and you could develop hives.

Irritant Contact Dermatitis: This condition develops when you use a certain type of makeup product for a long time. It means you will have an allergy to the cosmetics that you have been using for a long. And the common symptoms of this condition are burning of eyes, stinging sensation, and itching. In severe cases, you could have blisters around your eyes.

Eye sensitivity is always associated with makeup products and you should know which products can cause allergies. While your skin can show symptoms to prove allergies to certain products, it is better to know the cosmetics that can trigger allergic reactions Read More

Beginner’s Guide For Halo Eye Makeup

Beginner’s Guide For Halo Eye Makeup

Eyes speak a lot and for this reason, the first thing you see are eyes. Also, eyes need special attention during makeup for a similar reason. And there are many eye makeup tutorial for beginners to improve the eyes.

For example, you can groom your eyebrows, add more lashes to your eyes, or make a halo in each eye. For the halo, you will need to work on your eyes. You need to do primer, eyeshadow, and then glitter to create a halo. While it isn’t a difficult job, but you will need some tools and training.

Here’re the makeup tutorial for beginners & things you need to creating halos around your eyes

• Brushes – Long, Short, and Angled
• Eyeshadow Palette
• Concealer
• Brow Pencil
• False Eyelashes
• Gel Eyeliner

Quickly grab the said items and get ready to give your eyes halos. The job has to be done in steps and every step is important. Also, the level of challenge will increase with each step in eye makeup tutorial for beginners. One more thing is that you need to remove all spots and blemishes from your face that could distract the attention of viewers from your eyes.

A brief introduction

To get eye halo makeup, you need to create a background for the halo and then create the halo effect with glitter. Hide your dark circles, if you have circles under your eyes. Also, fine-tune your lashes, or get ready to wear mascara. And don’t forget to groom your eyebrows as they could play a spoiler at the end.

Beginner’s Guide For Halo Eye Makeup

Beginner’s Guide For Halo Eye Makeup

Step 1: Prepare Your Eyes For A Halo

Eyes can tell the truth if your mouth doesn’t. So, you should start fresh. Get a clean face with a wave of cleansing, toning, and moisturizing, so your eyes don’t look tired. Look at your face, it looks fresh, you can start by applying a primer to eyelids.

People with dark circles under their eyes should first dilute the circles with a concealer and then set the circles with a powder. And it can be … Read More

How To Get The Perfect Sun-Kissed Look With A Bronzer?

Get The Perfect Sun-Kissed Look With A Bronzer

Longing for a celebrity-style sun kissed makeup look & glow over your face. If yes, then take a bronzer and apply it to the areas where the sun would naturally touch your face. But avoid applying the bronzer all over your face as it will make it appear muddy.

Reasons For Using A Bronzer

While contouring would highlight your facial features, a bronzer a little warmth and glow to those features. Since you will apply bronzer on the areas where then the sun would naturally touch, your face will get a sun-kissed glow. Also, it will make your skin appear healthier. And you can use it all year.

While for some, using a bronzer is a summer trend, but little do they know that a little bronzer on their faces could be a massive game-changer.

Do you know how to apply a bronzer?

Proper application with the right tools could give you a sun-kissed glow within moments. And a little mistake in choosing the right color of the bronzer and applying it all over your face could spoil your look.

You simply go on applying a bronzer of any color on your face as there is a set procedure for using a bronzer. And the process starts with cleaning the face and then preparing your skin to accept a bronzer. Also, you shouldn’t use a darker shade as it will look unnatural.

First, know the cosmetics and tools you need to apply a bronzer for sun kissed makeup look

• Foundation
• Concealer
• Powder
• Makeup Brushes
• Bronzer
• Highlighter
• Blush

Get The Perfect Sun-Kissed Look With A Bronzer

Get The Perfect Sun-Kissed Look With A Bronzer

Apply a bronzer in the following steps for sun kissed makeup look:

  1. Prepare your skin

It is better to start with a clean face with no dirt, dust, excess oil, and pollutants. Clean your face well to get the sun-kissed look you are dreaming about.

• Take a mild cleanser and wash your face well in running Read More

Foundation: Types And Application Process

Foundation Types And Application Process

A foundation can go a long way in achieving flawless skin and the good thing is that you can choose the right formula for your oily skin. Also, you can try wearing the foundation using the right tools. For example, if you are using a liquid formula, you should use a beauty sponge instead of a brush.

A little foundation before makeup can help in hiding the dark spots and highlighting the important features. But the results achieved depend on factors like your skin type, the foundation used, and application.

Here’re three popular foundation types and steps to apply those foundations.

You can choose a foundation keeping your oily skin type in mind.

Liquid Foundation

Suitability: All Skin Types

The beauty of liquid foundation cosmetics is that they can be applied with anything including a stippling brush, flat-top kabuki brush, rounded foundation brush, or fingers. But experts suggest sponges for cream and gel foundation. A beauty sponge provides maximum coverage and a natural finish.

Steps To Apply Liquid Foundation

Step 1: Prepare Your Face

Clean your face with a gentle cleanser followed by a toner and a lightweight moisturizing lotion or cream. Allow the moisturizer to set on your skin before applying the primer.

Step 2: Apply The Foundation

Take your sponge and dampen it with water or a makeup setting spray before dipping it in the bottle of the liquid foundation. Wipe off some foundation on the broader end of the beauty sponge and start applying the foundation from the center of your face. And blend it well with a stippling or bouncing motion.

Step 3: Set The Foundation

Take a translucent powder or your favorite one and a brush to set your foundation. Once the base is done, you can start the makeup. Add mascara to your eyes, and some blush, also use a highlighter and color your lips to give a final touch to your makeup.

Foundation Types And Application Process

Foundation Types And Application Process

Mineral/Loose Powder Foundation

Suitability: Combination To Oily Skin

Loose powder foundation is … Read More

Step-By-Step Makeup Guide For College Girls

Makeup Guide For College Girls

College Girls Makeup– College life is the time when you want to look at your best and you don’t hesitate in experimenting with your look, makeup, and cosmetics. It is the time when you are at the top of your energy, dreams, and aspirations. It is the time when you want to show your true colors from simple to rebellious with natural makeup look tutorial.

If you are ready to go on a roller-coaster ride of changing your looks with your dresses then you should keep reading the blog as here you will get a complete tutorial on how to get gorgeous makeup with minimal makeup.

Let’s Start with step-by-step natural makeup look tutorial….

First, collect the natural makeup essentials

• Powder
• Foundation/BB Cream
• Eye Pencil
• Brush
• Blush
• Lipstick
• Mascara

Step 1

You are always in a hurry as you don’t want to miss a single moment of enjoying life to the full. Minimalist natural makeup look tutorial is a great way to enhance your look without messing with cosmetics. Also, you can find a few minutes to perfect a natural and fresh look without minimum makeup.

Brighten up your face instantly with a tinted moisturizer or a BB cream and get ready for the second step. And it won’t consume much time. Just keep your makeup kit ready and move your hands quickly to save time in makeup. Also, always use quality cosmetics that give the best results.

Step 2

So, you learn from tutorial how to save time while bringing out your natural makeup look and feel. And now you should learn to take advantage of the time saved in the first step to improve your look. Apply a dash of blush in a lighter shade preferably pink or coral onto your cheeks. And you will need a fluffy powder brush to apply blush.

It is a necessary step as it would make your skin appear healthier and add life to your face. While it is a little time-consuming, it is worth an effort. What you need to do to be quick is to arrange … Read More

Step-By-Step Tutorial For Natural Look With Minimalist Makeup

Tutorial For Natural Look With Minimalist Makeup

Makeup is a necessity but there is little need to put on the makeup that hides your natural beauty. It is called natural look and it involves maintaining your natural beauty as much as possible. You can also go for a minimalist makeup tutorial in which minimum makeup is used to get this natural look.

Celebrities ace this look because it reduces the use of creams and lotions that could develop into cracks or even meltdown in hot temperatures. But minimum makeup doesn’t mean removing makeup items altogether. The objective is to improve the natural look with minimum use of makeup products.

If you also want to get a natural look, you should start by minimalist makeup tutorial

Minimal Makeup Kit

• Moisturizer
• Concealer
• Bronzer
• Radiance Primer
• Cream Blush
• Luminizing Foundation
• Black Eyeliner Pencil
• Mascara
• Eyelash Curler
• Lipstick

Step 1: Prepping Your Skin

When you prepare your skin for makeup, you clean, tone, and moisturize the skin. Use a lightweight moisturizer that doesn’t make you feel sticky. Also, it is important to use a quality skin primer that further improves the skin condition and helps it to accept the makeup.

The objective of preparing your skin is to get an ultra-smooth surface that allows the makeup creams, lotions, and foundation to glide over your skin. Since it is an important step, you should be careful with the selection of your facial cleansers and toners.

Step 2: Applying Your Foundation

Here starts the minimalist makeup tutorial. The first thing is to apply a foundation that matches your skin tone. If you don’t want a foundation, you can use a tinted moisturizer but make sure it matches your skin tone. And choose a quality product that leaves a dewy and fresh glow on your face.

If you don’t find a foundation or tinted moisturizer matching your skin tone, you can mix two shades to get a flawless finish. The objective of the foundation is to bring out the natural beauty instead of getting a masked look. Your skin should look perfect and ready to accept the makeup. It is better … Read More

Emily Beauty Secrets

Emily Blunt’s Top 10 Beauty Secrets Revealed. When it comes to Hollywood’s leading ladies, Emily Blunt stands out not only for her exceptional acting skills but also for her timeless beauty. Over the years, she has managed to maintain a radiant and youthful appearance that has left us all in awe. While some may attribute her beauty to good genes, there’s much more to it than meets the eye in Emily Blunt beauty secret.

Emily Blunt Beauty Secret

Her natural and minimalistic approach to beauty products, combined with regular exercise and a balanced diet, has made her a timeless beauty icon. Her dedication to a holistic approach to beauty, both inside and out, serves as an inspiration to all those looking to enhance their natural beauty. In the midst of her busy career, Emily Blunt ensures she schedules me-time for activities such as reading, taking long baths, or enjoying spa days, which contribute to her overall well-being and beauty.

Emily Blunt follows a strict skincare regimen that includes gentle cleansing, daily moisturizing, and consistent use of sunscreen to maintain her flawless complexion. In this article, we will uncover Emily Blunt beauty secret, from her makeup routine to her diet and exercise regimen.

Emily Blunt’s Flawless Skin

One of the key aspects of Emily Blunt’s beauty is her flawless, radiant skin. To maintain her complexion, she follows a strict skincare regimen. Emily starts her day with gentle cleansing, followed by hydrating with a quality moisturizer. She is a strong advocate for sunscreen, which she wears daily to protect her skin from the harmful effects of UV rays.

Emily Blunt's Flawless Skin

Emily Blunt Beauty Secret And Dewy Makeup

While Emily Blunt’s makeup looks effortless, achieving her signature look requires some skill. Emily opts for a natural, no-makeup makeup look, emphasizing her features without appearing overdone. She prefers using mineral-based makeup products, which are not only skin-friendly but also provide a more natural finish. Emily’s makeup tutorial is a must-watch for anyone looking to recreate her subtle yet elegant look.

Emily Blunt’s Bouncy Hair

Emily Blunt’s Bouncy Hair

Emily Blunt’s hairstyle is always on point, and she is known for experimenting with various hairdos that complement her looks. Whether it’s her classic bobs, … Read More

Top 10 Winter Nail Colors To Flaunt This Winter Season

Winter Nails Color Ideas

Winter is here, and it’s time to give your nails a makeover to match the season’s chilly charm. As the temperatures drop and snowflakes begin to fall, it’s the perfect opportunity to explore a new spectrum of nail colors that resonate with the winter nails color palette. Whether you’re looking for winter nail color ideas or winter nail color designs, we’ve got you covered.

Winter Nails Color

In this article, we will guide you through the top 10 winter nail colors, from subtle and light color nails for winter to innovative and cute winter color nails, ensuring that your nails are as stylish as the rest of your winter wardrobe.

Icy Blue Winter Nails Color

Icy Blue Nail Color

When you think of winter, the first color that comes to mind is the crisp, cool shade of icy blue. Icy blue nails evoke the serene ambiance of a snowy landscape, making them a top choice for winter. This color can be worn in various styles, from a simple solid coat to intricate designs like snowflakes or frosty gradients. Icy blue nails are a perfect example of light color nails for winter that adds a touch of elegance to your overall look.

Deep Burgundy

For those who prefer something bold and rich, deep burgundy is an excellent choice for your winter nails. This shade captures the essence of mulled wine and cozy evenings by the fireplace. Deep burgundy nails provide a stark contrast to the white snow outside, making them a classic choice for the winter months. You can even experiment with matte or glossy finishes to suit your personal style.

Silver Shimmer Winter Nails Color

Silver Shimmer Winter Nails Color

Shimmering silver nails are a go-to choose when you’re seeking winter nails that sparkle and stand out. These nails mimic the glistening snow under the winter sun, adding a touch of glam to your overall look. You can opt for a solid silver shade or combine it with other winter-inspired designs like snowflakes or glittering frost for that extra pizzazz. Silver shimmer nails perfectly complement the cute … Read More