Hide Your Pimples Behind Makeup Or Distract Breakouts With Makeup

Hide Your Pimples Behind Makeup

Acne or breakout is common but it is unwelcome. A breakout, however small it is, could spoil your look. While there are treatment options available to treat acne, but the treatment takes time in giving results, so cover your acne with makeup.

The biggest problem with acne or breakout is that they can form anytime and without prior warning. So, if you aren’t ready to hide a red spot on your face, you will certainly miss big events.

Learn to cover acne with makeup

Cosmetics needed to cover acne and breakouts with makeup
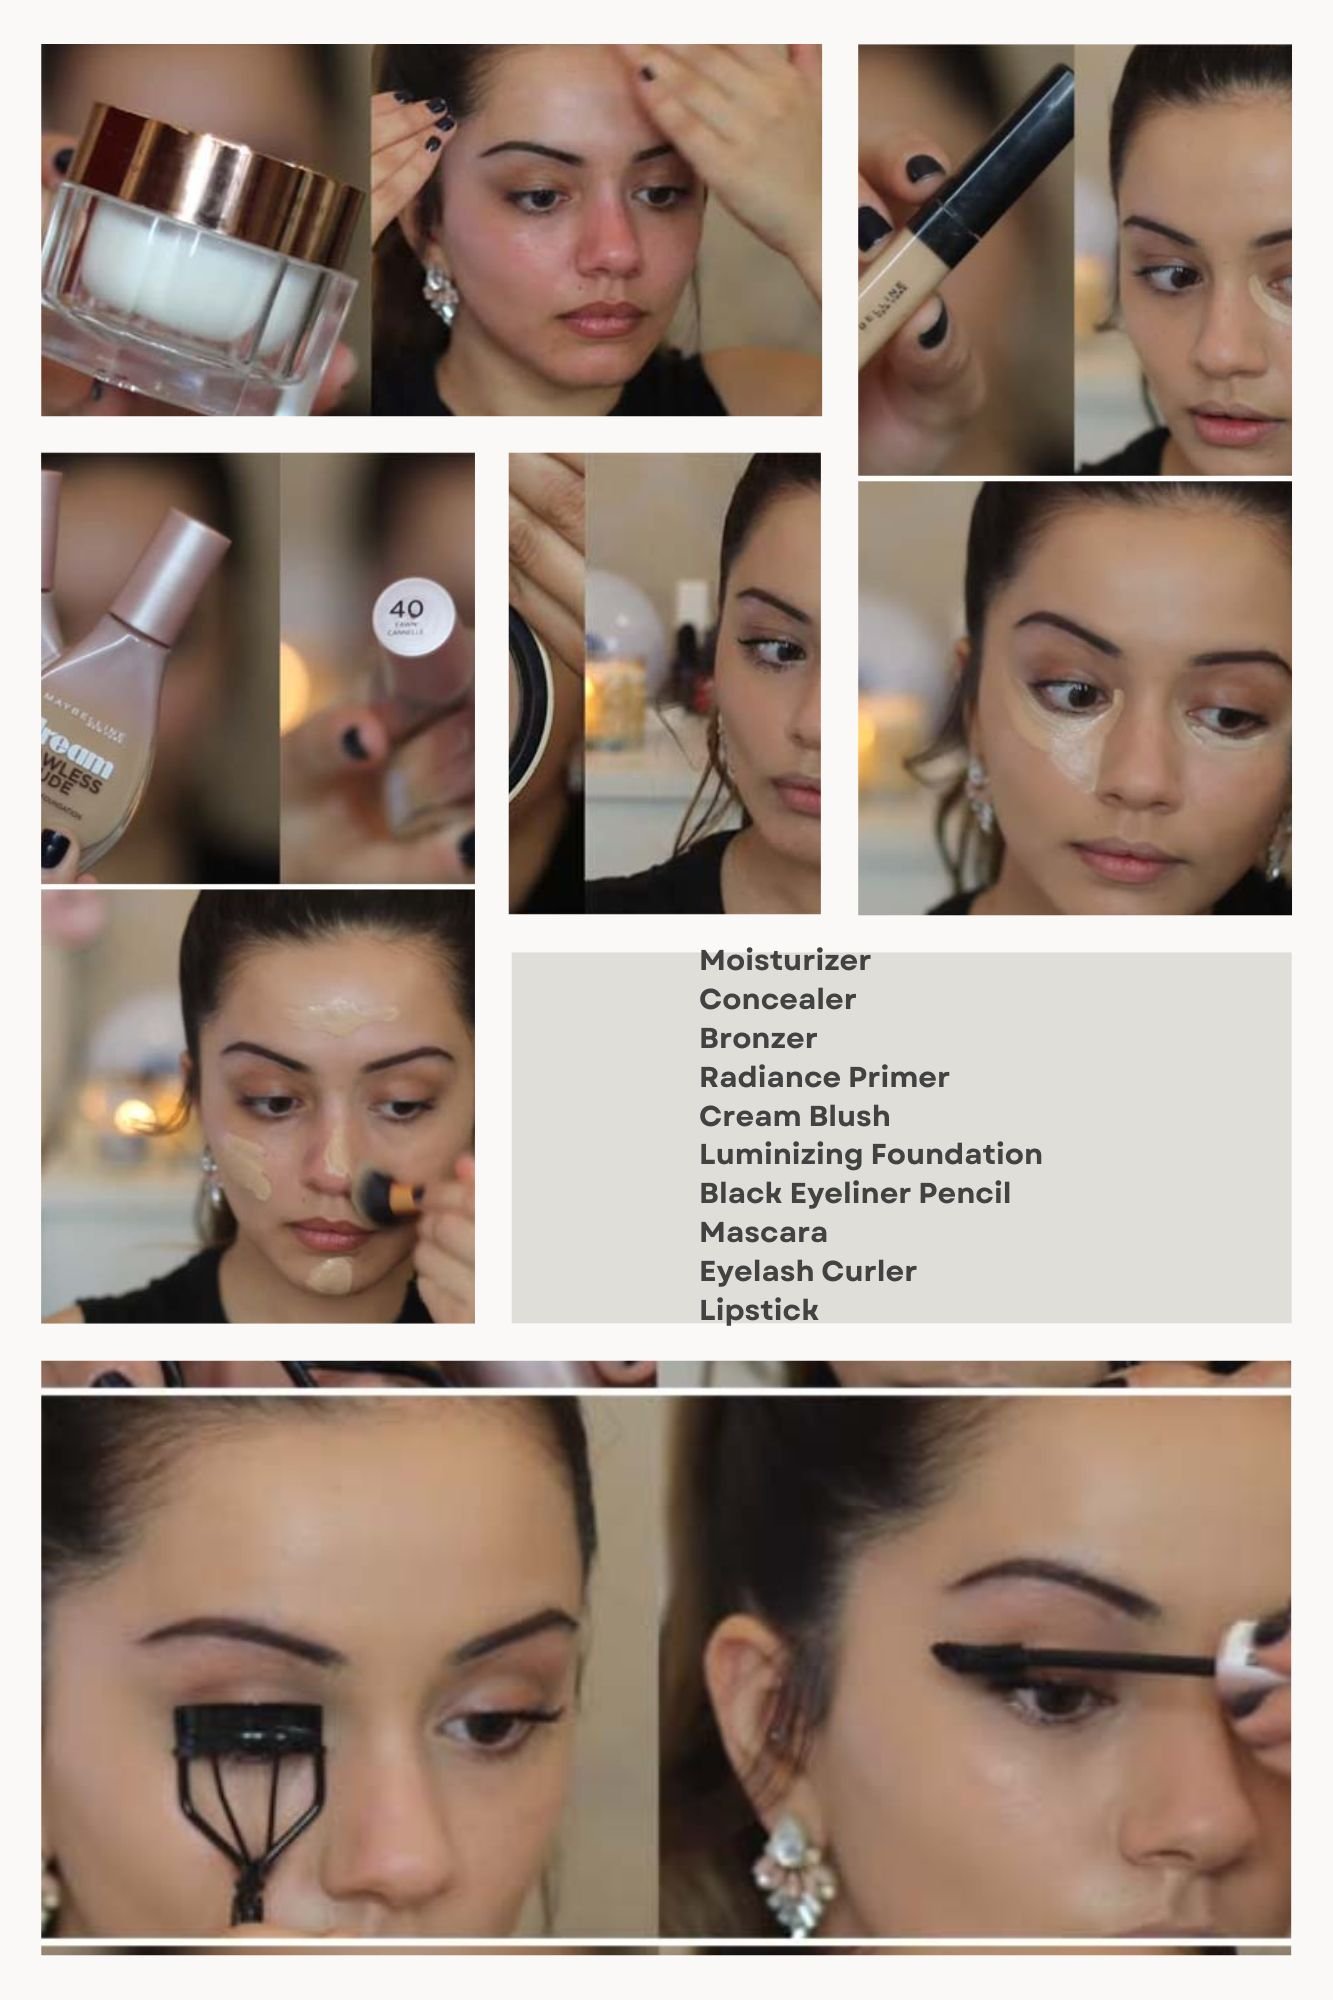
  1. Primer

A lightweight and oil-free primer would work well as it can hold the makeup at the inflamed spot for a long time. If you fear hyperpigmentation or scarring, then you should buy a primer with SPF. It is necessary to use an SPF cream as exposure to the sun could slow down the healing process and lengthen the suffering.

  1. Concealer

Find a matching concealer for your skin tone as color correcting can provide real help in hiding inflammation and scarring. Put more focus on finding the best match to get better results. It is only a matching concealer that can match the redness of the breakouts with your skin tone.

  1. Concealer Brush

A concealer can help hide your breakouts only when it is applied correctly. And for correct application, you need a spot concealer brush. Choose one that you are comfortable with so you get a perfect blending of the formula and precise application of the cosmetic. Quality of results achieved largely depends on the functionality of the brush.

  1. Foundation

Foundation forms a strong base of makeup and when you are wearing makeup to hide acne, you should use a non-comedogenic foundation that works well for acne-prone skin. Its advantage is that it contains lesser chemicals that will keep your skin safe and won’t interfere with your acne treatment. The lesser the chemicals used; the safer the skin is.

  1. Setting Powder

Buy mineral powder that will cover the inflamed spots without clogging … Read More

Tips For Safer Sensitive Eye Makeup

Tips For Safer Sensitive Eye Makeup

Eye sensitivity is a common problem but there is little need to worry about it as you can still do safe sensitive makeup without facing an allergic situation like irritation and watery eyes. First thing is to know what causes allergies to your eyes and second thing is to buy cosmetics that are safe for your eyes.

Also, you need to keep some tips and tricks in mind that can help wear eye makeup without any allergic reaction. But before you proceed, you should get an education on eye sensitivity.

What Is Eye Sensitivity?

Eye sensitivity is an allergy to foreign products including makeup products. Whenever you touch the areas around your eyes with cosmetics, you feel irritation in the eyes. It is called contact dermatitis. It could be due to an underlying skin condition or you could develop sensitivity to cosmetics over time.

Types of contact dermatitis

Eye sensitivity or contact dermatitis can be classified into allergic and irritant categories depending upon their causes. The classification helps in understanding eye sensitivity.

Allergic Contact Dermatitis: If you are allergic to certain products and those products are included in your cosmetics, you will develop allergic contact dermatitis. As a result, your eyes will become red and itchy. In severe cases, your eyes could swell and you could develop hives.

Irritant Contact Dermatitis: This condition develops when you use a certain type of makeup product for a long time. It means you will have an allergy to the cosmetics that you have been using for a long. And the common symptoms of this condition are burning of eyes, stinging sensation, and itching. In severe cases, you could have blisters around your eyes.

Eye sensitivity is always associated with makeup products and you should know which products can cause allergies. While your skin can show symptoms to prove allergies to certain products, it is better to know the cosmetics that can trigger allergic reactions on your skin.

Talc: Talcum powder is the real villain. This product can trigger allergies over time. But you can control talc allergy by … Read More

Beginner’s Guide For Halo Eye Makeup

Beginner’s Guide For Halo Eye Makeup

Eyes speak a lot and for this reason, the first thing you see are eyes. Also, eyes need special attention during makeup for a similar reason. And there are many eye makeup tutorial for beginners to improve the eyes.

For example, you can groom your eyebrows, add more lashes to your eyes, or make a halo in each eye. For the halo, you will need to work on your eyes. You need to do primer, eyeshadow, and then glitter to create a halo. While it isn’t a difficult job, but you will need some tools and training.

Here’re the makeup tutorial for beginners & things you need to creating halos around your eyes

• Brushes – Long, Short, and Angled
• Eyeshadow Palette
• Concealer
• Brow Pencil
• False Eyelashes
• Gel Eyeliner

Quickly grab the said items and get ready to give your eyes halos. The job has to be done in steps and every step is important. Also, the level of challenge will increase with each step in eye makeup tutorial for beginners. One more thing is that you need to remove all spots and blemishes from your face that could distract the attention of viewers from your eyes.

A brief introduction

To get eye halo makeup, you need to create a background for the halo and then create the halo effect with glitter. Hide your dark circles, if you have circles under your eyes. Also, fine-tune your lashes, or get ready to wear mascara. And don’t forget to groom your eyebrows as they could play a spoiler at the end.

Beginner’s Guide For Halo Eye Makeup

Beginner’s Guide For Halo Eye Makeup

Step 1: Prepare Your Eyes For A Halo

Eyes can tell the truth if your mouth doesn’t. So, you should start fresh. Get a clean face with a wave of cleansing, toning, and moisturizing, so your eyes don’t look tired. Look at your face, it looks fresh, you can start by applying a primer to eyelids.

People with dark circles under their eyes should first dilute the circles with a concealer and then set the circles with a powder. And it can be done after applying the primer.

Step 2: Develop The Crease

Once the primer job is complete, it’s time to grab your long-haired, fluffy blending brush and … Read More

How To Get The Perfect Sun-Kissed Look With A Bronzer?

Get The Perfect Sun-Kissed Look With A Bronzer

Longing for a celebrity-style sun kissed makeup look & glow over your face. If yes, then take a bronzer and apply it to the areas where the sun would naturally touch your face. But avoid applying the bronzer all over your face as it will make it appear muddy.

Reasons For Using A Bronzer

While contouring would highlight your facial features, a bronzer a little warmth and glow to those features. Since you will apply bronzer on the areas where then the sun would naturally touch, your face will get a sun-kissed glow. Also, it will make your skin appear healthier. And you can use it all year.

While for some, using a bronzer is a summer trend, but little do they know that a little bronzer on their faces could be a massive game-changer.

Do you know how to apply a bronzer?

Proper application with the right tools could give you a sun-kissed glow within moments. And a little mistake in choosing the right color of the bronzer and applying it all over your face could spoil your look.

You simply go on applying a bronzer of any color on your face as there is a set procedure for using a bronzer. And the process starts with cleaning the face and then preparing your skin to accept a bronzer. Also, you shouldn’t use a darker shade as it will look unnatural.

First, know the cosmetics and tools you need to apply a bronzer for sun kissed makeup look

• Foundation
• Concealer
• Powder
• Makeup Brushes
• Bronzer
• Highlighter
• Blush

Get The Perfect Sun-Kissed Look With A Bronzer

Get The Perfect Sun-Kissed Look With A Bronzer

Apply a bronzer in the following steps for sun kissed makeup look:

  1. Prepare your skin

It is better to start with a clean face with no dirt, dust, excess oil, and pollutants. Clean your face well to get the sun-kissed look you are dreaming about.

• Take a mild cleanser and wash your face well in running water. Make sure the cleanser reaches everywhere on your face
• Treat your skin with a toner and a lightweight moisturizer after your face is … Read More

Remove White Facial Hair In 9 Ways

Best Ways Of Facial Hair Removal

Are you worried about the growth of white hair strands over your upper lip or chin and don’t know how to get rid of those unwanted hair strands? If yes then keep reading as this blog is about facial hair removal.

There is little need to go into the reasons for the growth of white hair on your face, but you should know how to remove them safely. Also, the hair removal process should be painless and long-lasting.

Here are 9 ways of facial hair removal

Epilation

An epilator is an electric hair remover that removes white hair from its root. While it pulls out hair, it isn’t painful. On the contrary, it is more convenient than waxing. Also, it is more effective than shaving white facial hair.

How To:

• Soften your facial hair with lukewarm water
• Apply moisturizer to the area where you want to use the epilator
Glide the epilator in the opposite direction of the hair growth
• Rinse off your face and pat dry

Note: Epilation works on the hair of the size of ¼ of an inch.

Tweezing

Tweezing white hair is a manual process of unwanted & white facial hair removal. It is slightly painful, but you can go slow to reduce the pain. Its advantage is that it provides relief from white hair for at least 4-8 weeks.

How To:

• Get a pair of tweezers made of stainless steel
• Sanitize the device with isopropyl alcohol
• Or sterilize the pair of tweezers in hot water
• Start plucking your white hair one by one

Note: It is a slow process hence suitable only for removing a few strands.

Best Ways Of Facial Hair Removal

Best Ways Of Facial Hair Removal

Waxing

The waxing process works similarly everywhere. Just like you wax your armpit, you need to wax your white facial hair and remove them. While it is a painful process, waxing regularly could reduce the growth of white hair over time.

How To:

• Clean your face especially the area that needs waxing
• Apply hot wax over the area
• Use a waxing strip for the process
• Rip off the strip to pull out the … Read More

Foundation: Types And Application Process

Foundation Types And Application Process

A foundation can go a long way in achieving flawless skin and the good thing is that you can choose the right formula for your oily skin. Also, you can try wearing the foundation using the right tools. For example, if you are using a liquid formula, you should use a beauty sponge instead of a brush.

A little foundation before makeup can help in hiding the dark spots and highlighting the important features. But the results achieved depend on factors like your skin type, the foundation used, and application.

Here’re three popular foundation types and steps to apply those foundations.

You can choose a foundation keeping your oily skin type in mind.

Liquid Foundation

Suitability: All Skin Types

The beauty of liquid foundation cosmetics is that they can be applied with anything including a stippling brush, flat-top kabuki brush, rounded foundation brush, or fingers. But experts suggest sponges for cream and gel foundation. A beauty sponge provides maximum coverage and a natural finish.

Steps To Apply Liquid Foundation

Step 1: Prepare Your Face

Clean your face with a gentle cleanser followed by a toner and a lightweight moisturizing lotion or cream. Allow the moisturizer to set on your skin before applying the primer.

Step 2: Apply The Foundation

Take your sponge and dampen it with water or a makeup setting spray before dipping it in the bottle of the liquid foundation. Wipe off some foundation on the broader end of the beauty sponge and start applying the foundation from the center of your face. And blend it well with a stippling or bouncing motion.

Step 3: Set The Foundation

Take a translucent powder or your favorite one and a brush to set your foundation. Once the base is done, you can start the makeup. Add mascara to your eyes, and some blush, also use a highlighter and color your lips to give a final touch to your makeup.

Foundation Types And Application Process

Foundation Types And Application Process

Mineral/Loose Powder Foundation

Suitability: Combination To Oily Skin

Loose powder foundation is a lighter alternative to an oily liquid formula that could contain harsh ingredients and oils. People with sensitive skin & oily skin should use a mineral-based Read More

You Can Do Light Makeup At Home

Light Makeup At Home

Heavy makeup isn’t a necessity, but light makeup is. You can’t go to your office with layers of cosmetics sitting on your face. But you will feel comfortable in minimal makeup. And the good thing is that you can easily get light makeup at home.

Here’s the tutorial of doing light makeup at home of your face, cheeks, eyes, and lips.

Face Makeup

The first thing about light makeup at home for face is to follow a proper skincare routine to prepare your skin for the touchup. Following a skincare routine will keep your skin healthy and healthy skin looks beautiful even with minimal makeup.

Preparation:

• Clean your face and apply moisturizer
• Apply sunscreen as well, if you want added protection from the sun
• Using a primer is a good idea as it will provide a base for the makeup and allow it to sit for a longer time

Makeup:

• Start with a coat of foundation on your face. Take a stippling brush or a sponge and start applying the foundation in a circular and dabbing motion. Start from the center and blend it outwards to even out the skin tone.
• See whether you are getting the desired coverage. If not, then use a concealer to achieve perfection.
• Seal the makeup with a powder. Take a fluffy brush and apply powder all over your face in a sweeping motion. Give special focus to the t-zone and under-eye area.

Finish:

• Apply a translucent compact powder to get the last-minute touchups.

Your maximum time would be consumed in preparation and paying attention to preparation gives good results as the final look of your face and durability of the makeup would depend on the preparation.

Light Makeup At Home

Light Makeup At Home

Makeup For Cheeks

The most prominent facial feature is your cheeks. Set on cheekbones, they give your face a definite dimension. You need to work on the apple of your cheeks to improve their look.

How To:

• Pamper the apple of your cheeks with a quality blush. Use a fluffy blush brush and pat the blush on the apples. To blend the blush on the cheekbones, gently move the brush in the upward … Read More

Step-By-Step Makeup Guide For College Girls

Makeup Guide For College Girls

College Girls Makeup– College life is the time when you want to look at your best and you don’t hesitate in experimenting with your look, makeup, and cosmetics. It is the time when you are at the top of your energy, dreams, and aspirations. It is the time when you want to show your true colors from simple to rebellious with natural makeup look tutorial.

If you are ready to go on a roller-coaster ride of changing your looks with your dresses then you should keep reading the blog as here you will get a complete tutorial on how to get gorgeous makeup with minimal makeup.

Let’s Start with step-by-step natural makeup look tutorial….

First, collect the natural makeup essentials

• Powder
• Foundation/BB Cream
• Eye Pencil
• Brush
• Blush
• Lipstick
• Mascara

Step 1

You are always in a hurry as you don’t want to miss a single moment of enjoying life to the full. Minimalist natural makeup look tutorial is a great way to enhance your look without messing with cosmetics. Also, you can find a few minutes to perfect a natural and fresh look without minimum makeup.

Brighten up your face instantly with a tinted moisturizer or a BB cream and get ready for the second step. And it won’t consume much time. Just keep your makeup kit ready and move your hands quickly to save time in makeup. Also, always use quality cosmetics that give the best results.

Step 2

So, you learn from tutorial how to save time while bringing out your natural makeup look and feel. And now you should learn to take advantage of the time saved in the first step to improve your look. Apply a dash of blush in a lighter shade preferably pink or coral onto your cheeks. And you will need a fluffy powder brush to apply blush.

It is a necessary step as it would make your skin appear healthier and add life to your face. While it is a little time-consuming, it is worth an effort. What you need to do to be quick is to arrange everything in advance so you save some time for other steps.

Makeup Guide For College Girls

Makeup Guide For College Girls

Step 3

This step is going to be crucial … Read More

Step-By-Step Tutorial For Natural Look With Minimalist Makeup

Tutorial For Natural Look With Minimalist Makeup

Makeup is a necessity but there is little need to put on the makeup that hides your natural beauty. It is called natural look and it involves maintaining your natural beauty as much as possible. You can also go for a minimalist makeup tutorial in which minimum makeup is used to get this natural look.

Celebrities ace this look because it reduces the use of creams and lotions that could develop into cracks or even meltdown in hot temperatures. But minimum makeup doesn’t mean removing makeup items altogether. The objective is to improve the natural look with minimum use of makeup products.

If you also want to get a natural look, you should start by minimalist makeup tutorial

Minimal Makeup Kit

• Moisturizer
• Concealer
• Bronzer
• Radiance Primer
• Cream Blush
• Luminizing Foundation
• Black Eyeliner Pencil
• Mascara
• Eyelash Curler
• Lipstick

Step 1: Prepping Your Skin

When you prepare your skin for makeup, you clean, tone, and moisturize the skin. Use a lightweight moisturizer that doesn’t make you feel sticky. Also, it is important to use a quality skin primer that further improves the skin condition and helps it to accept the makeup.

The objective of preparing your skin is to get an ultra-smooth surface that allows the makeup creams, lotions, and foundation to glide over your skin. Since it is an important step, you should be careful with the selection of your facial cleansers and toners.

Step 2: Applying Your Foundation

Here starts the minimalist makeup tutorial. The first thing is to apply a foundation that matches your skin tone. If you don’t want a foundation, you can use a tinted moisturizer but make sure it matches your skin tone. And choose a quality product that leaves a dewy and fresh glow on your face.

If you don’t find a foundation or tinted moisturizer matching your skin tone, you can mix two shades to get a flawless finish. The objective of the foundation is to bring out the natural beauty instead of getting a masked look. Your skin should look perfect and ready to accept the makeup. It is better to spend some time on the foundation to do a perfect job.

Tutorial For Natural Look With Minimalist Makeup

Tutorial For Natural Look With Minimalist Makeup

Step 3: Time For Concealer

Look at … Read More

10 Highlights Of A Glitter Face Makeup Look

Glitter Face Makeup Look

Glitter makeup fascinates everyone from makeup pros to beginners. From eyes to lips to cheekbones, the possibilities are endless, but so are the chances to falter on a glitter face makeup look. For example, glitter can fall over your face if you don’t fix it properly. Another challenge is to prevent glitter from creasing on your eyelids. Glitter makeup is fun if you can wear glitter like a pro. It looks amazing. Also, it is the easiest way to sparkle your face.

Here are some fascinating glitter ideas with makeup tips

Edgy Glitter Tear

Create a glitter face makeup look with glittery tears cascading down your cheeks just like the real tears. Even though it isn’t the right look for work or business, we find it suitable to show off your inner sparkle at parties. But first, you need to get the basics right. For example, if you are working with coarse glitter, you will need a glitter primer or glue to achieve the right look.

Bold Blue Cat Eyes

You need lots of colored glue and a load of glitter to achieve this glitter face makeup look. First, paint your eyelids blue and then fix silver glitters all over the blue glue. It will make you a style icon even if you go with little makeup on your face. For damage control, keep a microporous tape ready to look after any fallout. Also, avoid removing fallen glitter pieces with wet wipes as it will only spread them further.

Glitter Highlight

You can achieve this glitter face makeup look with glue and glitter. Also, it is easy to use. You only need to create a highlight with glue and fix glitter. If you don’t have glue or you are allergic to glue, you can use Vaseline to fix glitters. The biggest challenge with glittery makeup is managing the fallout. First, you should fix glitter only on the glue and second, you should shed loose glitters to prevent fallout.

Glitter Face Makeup Look

Glitter Face Makeup Look

Barbie Pink Glitter Lips

As said earlier, glitter can be applied all over your face including lips. Glittery lips makeup are … Read More